Monday, December 31, 2012
Wishing you a Happy Ramblings New Year!
I would like to wish all my new blog, Google+ and Pinterest friends a very Happy New Year from New Zealand! I hope that you all have fun with your New Year's celebrations to see year 2013 in.
I will be seeing the New Year in, literally, with a difference this year. I have a new pair of glasses which I picked up today. Amazing...I can seeeee lol. I wore them to go to the supermarket straight afterwards and could actually see the labels on products, and the prices, without having to walk up to the shelf! Does this mean I will be spending more money at the shops? hmmmm.
And the bright colours and detail, wow. Now it will be easier for me to take photos and enjoy the scenery around me. I still prefer looking at my Christmas tree, with all its lights on, without my glasses. It is in a wonderful soft blurry focus like looking at a Christmas card with halos around all the lights :)
Looking forward to sharing more with you in the New Year.
Here's to a happy and healthy 2013.
Cheers! xxx
Sunday, December 30, 2012
The making of a real New Zealand Pavlova
Yesterday morning was rather eventful. It resulted in lots of laughter while making a Pavlova to take to my sister's as my contribution for lunch.
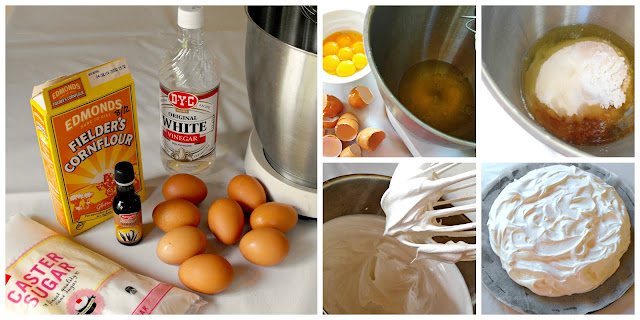
I got up bright and early so that I could make the Pavlova and give it plenty of time to cool for lunch time. All the ingredients were gathered up. Eggs out of the fridge early to get to room temperature. Oven on. Baking tray papered, oiled and sugared. Camera at the ready so that I could show you what a perfect New Zealand Pavlova is like.
Everything was going perfectly. The egg whites whisked up beautifully to stiff peaks and I spread the Pavlova mixture out on my prepared tray as I had done many times before when making this recipe.
Then I had time to have a relaxing soak in the bath before getting ready to go out. Mum was given instructions on turning the oven off after half an hour. I set the oven timer and I set the little portable timer for 30 minutes so that mum could keep it with her in case she didn't hear the one in the kitchen.
I was enjoying my bath when, after half an hour, I heard mum frantically calling me. I ran into the kitchen and there was smoke billowing out of the oven. There was so much smoke that it was hanging 4 foot thick from the ceiling! Mum asked if it was supposed to smoke lol. We opened the oven door to find this: (scroll down slowly to keep the suspense going)...
...
...
...
ta-daaaaaa!
A huge mutant Pavlova taking up the whole shelf of the oven...eeeks!
It looked like if was quite able to escape from the oven all by itself. And it had the consistency of a very tough omelette. My eyes popped out of my head. I scratched my head. I shook my head in disbelief. What had gone wrong???
Mum looked at the oven temperature and it was still set at 230 C. I had forgotten to turn it down to 120 C immediately after putting the Pavlova into the oven! Oooops. I burst out laughing (or was it hysterics?).
By this time it was 12.00 pm. We were due at my sisters for 1.00 pm for my 3 year old nephews Birthday party. Don't panic, don't panic, breath....slooooooooowly....think, think. I had enough ingredients to make another Pavlova. 15 minutes for me to prepare it, including mum on tray preparation duty and dad scrubbing the oven and shelf clean. One hour in the oven and a little time so that the Pavlova would be cool enough to take in the car to my sister's undecorated. We could do it.
Time to try again.
I phoned my sister and told her what had happened and that we would be half an hour late. After popping the new Pavlova in the oven I hopped back in the bath. Time to relax. This time everything went well. The Pavlova came out of the oven looking as it should. Phew!
I waited until we had finished our main course before whipping up the cream and spreading it on the Pavlova. Then I topped it up with fresh strawberries, blueberries and raspberries.
The Pavlova was enjoyed by all and I had a fun afternoon playing with my nephew :)
Now...the question is...what am I to do with 16 egg yolks? Does anybody have any ideas?
Here is the recipe for my Pavlova:
N.B. I double this recipe when I make this Pavlova and bake it on a 13 inch diameter baking tray. When doubling the recipe, don't double the vinegar quantity and only use 1 1/2 teaspoons of vanilla essence.
Pavlova Ingredients:
4 egg whites (room temperature)
2 cups caster sugar
1 dessertspoon cornflour
1 dessertspoon white vinegar (only use white)
4 tablespoons boiling water
1 teaspoon vanilla essence/extract (do not use artificial flavouring)
Topping Ingredients:
Fresh cream
Fresh fruit, such as: strawberries, raspberries, blueberries, sliced kiwifruit, pawpaw, mangoes.
(Sliced bottled peaches are also nice on Pavlova)
Method:
Turn oven on to 230 C.
Prepare a round baking tray by oiling it then covering with baking paper. Oil the baking paper and dust it with caster sugar. Shake off the excess caster sugar.
Put all the Pavlova ingredients, except boiling water, in the electric mixer. Start the mixer going on slow then add the boiling water. (If you add the boiling water before the mixer is going it will cook the egg whites). Turn the mixer up to high speed and beat until very stiff.
Put mixture onto the baking tray and spread it into a thick circle. The Pavlova will spread a bit while baking, so don't spread the mixture right to the edge of the tray. Make the top of the Pavlova flat.
Put the Pavlova into the 230 C oven, in the middle, and turn the temperature down to 120 C immediately! Leave for 30 minutes, then turn the oven off and leave in the oven for another 30 minutes.
Cool the Pavlova, on the baking tray, completely. Don't worry if you see cracks forming while the Pavlova is cooling. This is normal. The cream will cover most of the cracks.
Just before serving cover the top with a thick layer of thickly whipped cream and fresh fruit.
Keep any left over Pavlova, if there is any! in the fridge. You can still eat it the next day, although it will be a bit soft.
Enjoy xxx
Friday, December 28, 2012
Brilliant 12 Days of Christmas present
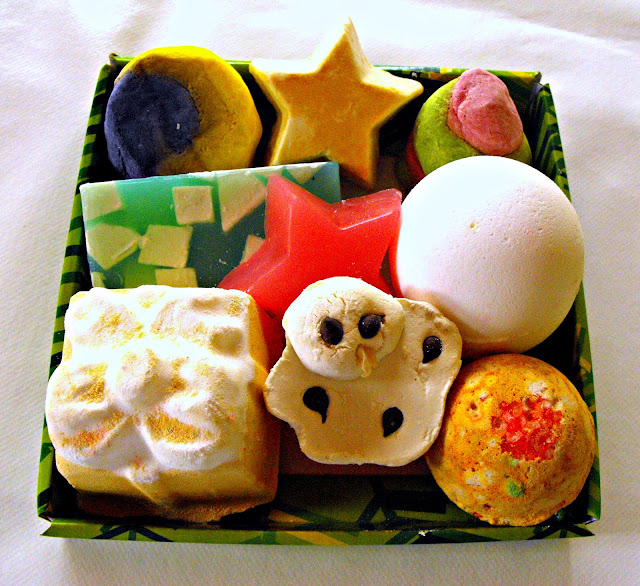
My brother and his wife gave me such a fun gift for Christmas. It is a 12 Days of Christmas gift box from Lush, full of lots of bathtime goodies. There is one thing for each of the 12 days of Christmas. They are very colourful and smell like a sweet shop. I wasn't sure about them at first until I tried using them.
I tried the ones below first:
1. On Christmas morning I ran my bath, hopped in and added the Father Christmas Bath Ballistic (the one on the left). All was well at first, lots of fizzing and white frothing. Bright red then started pouring out with piles of white foam. Then bronze glitter....huuuuuuuge bronze glitter....tonnes of it! Followed by lots of deep green fizz. The ball whizzed around the bath releasing a lovely tangerine scent. But oh, noooooo, tonnes more glitter. Glitter everywhere and the bath had turned a dark moss green. Very reminiscent of pond algae and I was sitting in it. I sat there, covered in glitter, in shock. (I am laughing so much as I am writing this!). I tried to wipe the glitter off me with a flannel, but it was stuck tight. Oh nooooo....I was getting ready to go to my brother's house for Christmas lunch....and I looked like some horrible bronze tanning experiment gone wrong! I sat there for a little while longer not wanting to waste the bath bomb, but enough was enough and I hopped into the shower to scrub the glitter off. But the glitter didn't want to come off....oh no...it was there to stay. You know what glitter is like, stubborn stuff. After 15 minutes I managed to get most of it off me. That was probably the cleanest my skin has ever been!
2. On Boxing Day I decided to try the Santa's Sack Bubble Bar (the one in the middle). But this time I was more cautious. I crumbled it in the bath, per the instructions, and watched and waited. The water turned a lovely pink and was covered in a layer of white foam. The room was filled with the smell of fruit. I was happy.
(I didn't realise that I was supposed to have broken out and reserved the two "gifts" from the sack to use for two more baths....oh well....next time).
3. On the 27th I tried the Party Popper Bath Ballistic (the pink and blue cone on the right). It whizzed wildly around the bath as it fizzed, releasing bright blue and pink swirls of foam and little bits of orange soap confetti. It smelt lovely. The bath water then turned a very pretty light lavender colour. Happy again.
4. This morning I spent ages deciding which one I was going to try next:
I finally decided on the Golden Wonder Bath Ballistic. And this time decided to take photos of what happened. Again there was no way that I was going to hop into the bath until I knew the result.
This one fizzed quietly, releasing yellow colour at first. Then a few blobs of pink followed by light blue. It reminded me of chemistry experiments at school, and toxic waste haha. The water finally turned a lovely turquiose colour with little yellow soap stars floating in some white froth. (If you click on the collage below, you can just see the little stars in the top right photo). The stars slowly dissolved and I hopped in the bath. I was surprised to find that the water was swirling and shimmering with very fine gold dust. It was very pretty and didn't stick to my skin. I enjoyed this bath very much. I can't wait until tomorrow to try my next bath.
See you again soon. Hugs xxx
Wednesday, December 26, 2012
Santa Sack - 15 essential Christmas gifts for me
I am a big kid at heart and still like the excitement of opening a Santa Sack at Christmas. But this is a Santa Sack with a twist.....
A few years ago I decided to make a Santa Sack for myself to open at Christmas. This way I could be certain to receive what I really like and enjoy :) My Santa Sack is actually a red pillowcase. I chose a pillowcase to use because that is what we used to receive our presents from Father Christmas in when we were children.
So from the beginning of each year I start collecting little things to put in my Santa Sack. Once I have put something in it I leave it there until Christmas. No peeping. No reminding myself of what is in there. Gradually over the year my Santa Sack becomes fuller and by Christmas it is almost overflowing!
I had a lot of fun opening my Santa sack this Christmas. I had forgotten about a lot of the things I had put into it, especially from earlier in the year, so it was a nice surprise, and I still loved them all.
There were 15 presents inside:
2. Large box of yummy Bassetts Jelly Babies
3. Box of The Fruit Tree Oranges & Lemons fruit jelly slices
4. Toile de Jouy padded coat hangers
5. Some spending money, nicely gift-wrapped, to spend as I like during my 3 week Christmas
holiday this year.
6. A large box of Thornton's Fruit & Nut Special Toffee....yuuuuum! A colleague brought this back
from England for me on request. She asked me if there was anything that I would like her
buy while she was there.
7. Box of Belgian Cherry Liqueur chocolates
8. Bottle of L'Occitane Lavender Harvest Foaming Bath
9. Bottle of L'Occitane 4 Reines Rose Bath and Shower Gel
10. Bottle of L'Occitane Cherry Blossom Bath and Shower Gel
11. L'Occitane 4 Reines Rose Bath Powder. It took me ages to track some of this down as L'Occitane
have stopped producing it.
12. Emily Button Mousey to sit on my desk :)
13. Kirsty Allsopp House Jotter Box containing memo notes for my desk
14. Kirsty Allsopp sticky notes set for my desk
15. A heart shaped box of French chocolate truffles
My sister and dad gave me money for Christmas this year which is great. I will be using it to fill my Santa sack for next Christmas. And it is so much fun finding nice things throughout the year. I like finding little things that I like just as much as using them.
Labels:
Christmas,
Santa Sack
Tuesday, December 25, 2012
Christmas wishes to all who visit my blog!
I hope that you have a wonderful Christmas with lots of fun and laughter, and that Father Christmas is good to you.
Yesterday mum, dad and I enjoyed our Christmas Eve dinner. We had a lovely cold meal because it was too hot and humid here do anything else. I tried to make it look Christmassy with a selection of red, white and green foods.
The day before, Mum and I went to Farro to choose some cheeses and enjoyed a little cheese sampling session. I told the assistant that I like the flavour of Maasdam, and do not like goats cheese or blue cheese. I have never been able to get blue cheese more than a hands length away from my mouth without gagging. I really did try.
The first cheese I tried was very bland, so much so that I can't remember the name of it. Then I tried a second cheese....aaargh.....he tricked me....it was disgusting. Mum said the expression on my face was classic. Mum gave the cheese a taste and said it was just like blue cheese, even though it had no icky black and blue, disgustingly horrible mouldy bits in it. I couldn't get the taste out of my mouth. The third cheese was delicious though. It was Old Rotterdam Gouda. My mouth is watering just thinking of it; sweet, nutty, tangy and salty. We bought some of that, plus some Maasdam. Mum and dad also chose a blue cheese from the supermarket.
We also bought Italian Mozzarella, pepperdews and olives from Farro. The pepperdews and green olives were stuffed with feta cheese and I arranged the strawberry tomatoes with the Mozzarella and fresh basil leaves.....yummy! We also had four different types of fish; Salt herrings, roll mops plus cold smoked and hot smoked salmon.
We ate so much that we couldn't manage any dessert and were satisfied to finish the meal with the cheeses. Afterwards I opened my Santa sack. That is a story for another post.
Enjoy yourself in the meantime! xxx
Monday, December 24, 2012
A flurry of decorated sugar snowflakes
Phew! It's been a very busy week preparing for Christmas. But I still managed to find time to play with making these pretty little sugar snowflakes :)
I searched the net for snowflake decoration ideas for my Christmas cake and found many recipes for Snowflake cookies. But I didn't think they would taste right with a fruit cake. I really liked the look of them though, so I put my thinking cap on. I remembered making little hard sugar mice when I was little. So I Googled sugar mice recipes and found a very similar one. They are made using icing sugar, egg white and golden syrup and are very easy to make. I used a rolling pin to roll the mixture out and then cut the snowflakes out with cookie cutters. Then the snowflakes were left overnight to set rock hard. Perfect for what I wanted.
I searched the net for snowflake decoration ideas for my Christmas cake and found many recipes for Snowflake cookies. But I didn't think they would taste right with a fruit cake. I really liked the look of them though, so I put my thinking cap on. I remembered making little hard sugar mice when I was little. So I Googled sugar mice recipes and found a very similar one. They are made using icing sugar, egg white and golden syrup and are very easy to make. I used a rolling pin to roll the mixture out and then cut the snowflakes out with cookie cutters. Then the snowflakes were left overnight to set rock hard. Perfect for what I wanted.
I used Royal icing and a number 2 icing nozzle to decorate the snowflakes with. My first attempts at decorating the snowflakes were a disaster. It is easier to pipe patterns with straight lines than curved ones. At first I used patterns that I saw on the net. Then suddenly became inspired and more patterns just popped into my head. It was really cool! I would have gone on all evening, except my piping bag burst with a huge bang making me jump out of my skin. I had squeezed too hard and the side seam split open.
Here are the recipes that I used to make the decorated sugar snowflakes.
Tonight we are having our Christmas Eve dinner (a Polish tradition). It is going to be a cold meal with all our favourite summer foods.
All the presents are wrapped and ready to give. The grocery shopping is all done and the house is decorated, apart from putting the candles on my red and gold Christmas tree. Don't worry, I don't light them, they are just for decoration. I found the clip-on Christmas tree candle holders on Ebay from Latvia and red German candles to go in them. We used to light candles on our Christmas tree when I was little. They looked magical. Luckily the tree never caught fire!
If you celebrate Christmas, I hope that you are enjoying your preparations as much as I am xxx

Saturday, December 22, 2012
Last minute Christmas cake recipe (part 3)
And finally, here is the recipe for the Royal Icing and instructions for constructing the Christmas cake. Enjoy!
Edit: You can see part 1 of the recipe here and part 2 of the recipe here.
Edit: You can see part 1 of the recipe here and part 2 of the recipe here.
Last minute Christmas cake recipe (part 2)
Hi again.
Just in case you weren't able to open the recipe link in my last post, I have cut and pasted the recipe directly here. I will need to put the rest of the recipe in a separate post as it won't let me format pictures when there are a few large ones in the same post for some reason.
Please let me know if you have any questions about the recipe :)
Edit: you can see Part 1 here and Part 3 here of the Last Minute Christmas Cake recipe.
Friday, December 21, 2012
Last minute Christmas cake recipe (part 1)
I was so absorbed in creating this new blog that I totally forgot to make my Christmas cake! Oh noooooo, major panic. Then I remembered that I have a delicious and moist mid-Winter Christmas cake recipe which I usually make in July, our coldest month in New Zealand when we celebrate mid-Winter Christmas.
Mid-Winter Christmas is a popular tradition here, which gives us that wonderful experience of having a Christmas in Winter, as the days are colder and it gets dark earlier. At this time people here have full Christmas dinner parties (minus the presents) and you can even have Christmas dinners in restaurants. Many shops display their Christmas decorations and public mid-Winter Christmas events are organised. What could be better than having Christmas twice a year!
Sooooo, last night I found my recipe and soaked the fruit mixture in brandy, ready to make the cake today. Phew, just in time! This cake doesn't need to mature and is really nice eaten even on the same day that it is baked.
The cake turned out really well and I decided to sprinkle it with some brandy, which I don't normally do, and let it absorb overnight.....well, it is Christmas. Today I glazed the cake with melted apricot jam, then covered it with a layer of marzipan and iced it with Royal icing.
Recipe: You can see Part 2 here which shows the cake recipe
and also Part 3 here which includes the Royal icing recipe. Enjoy 😊
If you need more information on how to make this cake, just post a comment with your question and I will try to help.
Wednesday, December 19, 2012
Suspense over, here is my Christmas tree
Yaaaaaaaay, finally! You won't believe how long it took me to get these photos the right size and where I wanted them to be in this post. I had a fight with the compose toolbar and won lol.
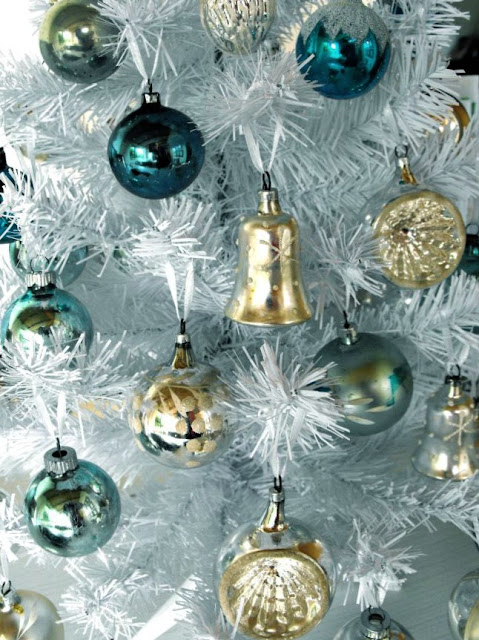
My tree is just how I pictured it to be, so magical with its shiny and bright, antique and vintage decorations. The aqua blues, silver and white look so good together. It is like looking and a snowy, frosty, winter scene, a bit like Narnia. And very reminiscent of the large blue and white Christmas tree we had when I was little. It is quite a contrast to the 26 C heat, plus high humidity, we are experiencing in New Zealand at the moment.
When I was searching on Ebay for my decorations, I used my snipping tool and snipped pictures of the baubles that I liked. Then put scaled up pictures of them into OneNotes to help me to work out the right combination and number of baubles to buy. OneNotes is so useful, I use it to organise things all the time as you can see from the coloured headings below.
When the decorations arrived, most of them were extremely dirty. They had decades of dust and grime on them. Some of them date back to the 1930's. I spent a whole day cleaning them very carefully. I used nothing but my breath and Q-tips. I breathed on small areas at a time, a bit like a kid misting up a window to make finger patterns, then with Q-tips I gently worked on the glass, avoiding the glass glittered areas. I didn't want to damage any of the fragile finishes. A couple of the decorations had candle wax on them which I left. I think it adds to their charm. I was amazed at how shiny and bright they came up. You can see the difference between the snipped pictures above of my decorations before I bought them and how they look on the tree after cleaning them up.
It is lovely sitting working at my desk now with this view. My cats are behaving themselves and haven't jumped on the desk to investigate yet. But it won't be long before they do. Guido, my Siamese cat, is very careful though. He always treads delicately around things.
Tomorrow morning I am going to be baking my Christmas cake, which reminds me that I forgot that I need to soak the fruit in brandy overnight.....oooops........will be right back.......
Okay, all done!
Then in the afternoon I will finish decorating my big green Christmas tree with red and gold baubles, plus vintage spun cotton snowman cotton decorations that I have started collecting. I also need to wrap all the Christmas presents which I always do sitting by the Christmas tree listening to old Christmas music from YouTube. I love this time of year so much.
Back soon xxx
Labels:
Christmas,
Christmas ornaments,
Christmas tree,
tree
My silver and turquoise Christmas tree in progress
Being surrounded with antique and vintage Christmas tree decorations was total bliss yesterday. Choosing where to place each one on my little white tree took quite a bit of thought. But I had just the right number of ornaments and colours for the effect I wanted (big grin). Just imagine the ecstasy if I had a 6 foot tree to decorate!I also had loads of fun today after discovering the free PicMonkey photo editor, as you can see with my collage here. I experimented with all the different photo editing options. It was really easy to learn how to use and there were funny hints when I didn't quite get things right, like the error message below:
You can see a glimpse of my finished tree in the picture behind the error message! I will post photos of it next. Ooooooooh, and I got another little parcel in the post today! Thanks for stopping by xxx
Labels:
Christmas,
Christmas ornaments,
Christmas tree,
tree
Monday, December 17, 2012
Addicted to vintage glass Christmas tree ornaments
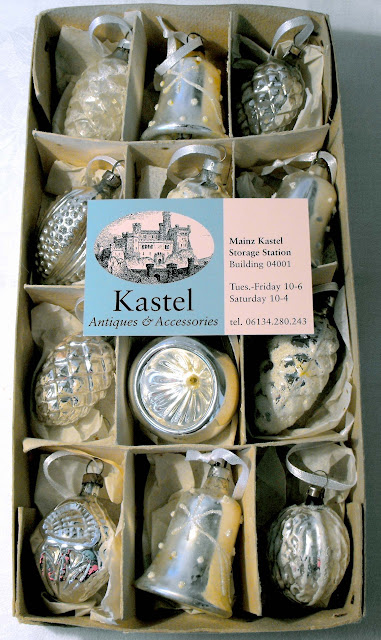
Have you ever been so totally absorbed in something that weeks flew by without you even noticing? This happened to me while I was hunting for vintage glass Christmas tree ornaments over the past month on the internet. It was so much fun that I was quite addicted. Only the threat of my quickly depleting bank balance broke the spell! These are photos of some of the things that I bought.
Some of the decorations that I saw were identical to those that we hung on our Christmas tree when I was little. And a lot of the silver baubles in the top picture are similar to those that dad had in Poland before the war. It brought back many vivid memories. It is amazing how little balls of coloured glass can make you so sentimental.
I became quite nostalgic wanting to copy a white Christmas tree, that we used to have, which was covered with turquoise baubles. I also wanted to add some silver sparkle. So many pretty things to choose from!
Then followed days of holding my breath waiting for my decorations to arrive from Germany. They arrived in one piece, all packaged very carefully. My 2 foot high table top Christmas tree from America arrived shortly after.
Tonight after dinner I will be decorating my tree........very happy :)
See you again soon. xxx
Labels:
Christmas,
Christmas ornaments,
Christmas tree,
tree
Sunday, December 16, 2012
It doesn't take much to make me happy
Then something my mum said to me a few weeks ago popped into my head. That it doesn't take much to make me happy. This is very true. So from this little thought the idea for my new blog was born. And what better time to start than the days leading up to Christmas!
I have so many things that I can't wait to share with you here. My new Christmas tree, giving my Poinsettia plant a haircut! vintage Christmas decorations.....
See you soon with photos xxx
P.S. In the meantime I would love to hear about what some of your favourite Christmassy things are. Make yourself comfortable, grab a drink and some of your favourite cake!
Subscribe to:
Posts (Atom)


